We remain fully operational. Our teams are working around the clock to ensure your deliveries continue safely.

Laden Sie die App herunter


Kundendienst
Copyright © 2025 Desertcart Holdings Limited
Laden Sie die App herunter


Buy anything from 5,000+ international stores. One checkout price. No surprise fees. Join 2M+ shoppers on Desertcart.
Desertcart purchases this item on your behalf and handles shipping, customs, and support to Austria.
💻 Unleash Your Creativity with Every Pixel!
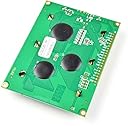
The CANADUINO® LCD12864 is a high-quality blue and white graphic display featuring a resolution of 128x64 pixels. It comes equipped with an integrated ST7920 controller, supporting both SPI and Parallel interfaces, and includes a dimmable bright LED backlight for enhanced visibility.
| ASIN | B07B2HLQ7M |
| Best Sellers Rank | #7,713 in Single Board Computers (Computers & Accessories) |
| Brand | CANADUINO |
| Customer Reviews | 3.7 3.7 out of 5 stars (15) |
| Item Dimensions L x W | 3.66"L x 2.76"W |
| Item Weight | 0.05 Kilograms |
| Manufacturer | UNIVERSAL-SOLDER Electronics |
| Model Number | N.A. |
| Platform | Not Machine Specific |
| Processor Count | 64 |
G**S
Nice Display. Here's a brief quick start guide for the Arduino Uno
This is a very nice display. It shipped relatively quickly from Canada to the US. You can find several tutorials how to connect an 12864 GLCD ST7920 display like this one to an Arudino. But if you are in a hurry, here's a quick start guide to get you going with the Arduino Uno. This worked with my display and Arduino IDE 1.8.13 and an Arduino Uno. 1) Install the U8g2 library in the Arduino IDE. a) Open the Arudino IDE, and select Tools > Manage Libraries... from the menu b) Enter U8g2 in the search box at the top of the dialog and press enter c) Scroll through the results to the U8g2 listing, and click on the Install button. 2) Connect the GLCD display to the Arduino Uno using the Hardware SPI pins: GLCD Pin Arduino Pin --------- ----------- BLK 20 GND BLA 19 +5V E 6 13 (SPI MOSI) R/W 5 11 (SPI SCK) RS 4 10 (SPI CS) VCC 2 +5V GND 1 GND 3) Open the U8g2 GraphicsTest example, compile and run it a) Select File > Examples > U8g2 > Page Buffer > GraphicsTest on the menu b) Find the large block of commented out constructors for the many displays U8g2 supports. c) Find the line for the following constructor: //U8G2_ST7920_128X64_1_HW_SPI u8g2(U8G2_R0, /* CS=*/ 10, /* reset=*/ 8); d) Un-comment that line, and change the reset pin 8 to U8X8_PIN_NONE, for no reset. e) The U8g2 constructor should now read: U8G2_ST7920_128X64_1_HW_SPI u8g2(U8G2_R0, /* CS=*/ 10, /* reset=*/ U8X8_PIN_NONE); 4) Compile and upload the code to the Arduino Uno. You will now see the U8g2 Graphics demo running on the GLCD. (Note: If you want to use a reset pin, connect Arduino pin 8 to RST pin 17 on the display. This example uses Arduino hardware SPI, and pins 11 and 13 cannot be changed. The U8G2_ST7920_128X64_1_SW_SPI constructor will allow one to use different pins but it uses Software SPI.)
H**I
Great
Great product. Having fun with Arduino projects.
F**M
Great value.
M**R
La couleur du blanc est satisfaisante mais pas aussi éclatant ou brillant que prévu.
S**K
Thank you.
M**O
nice display
TrustPilot
vor 1 Tag
vor 1 Monat