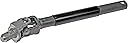
Dorman 425-176 Steering Shaft Compatible with Select Models
Product ID: 1434822
⚙️Precision-engineered fit
🛠️Durability tested for reliability
🛡️Meets strict safety standards
Desertcart purchases this item on your behalf and handles shipping, customs, and support to Austria.
🛠️ Upgrade your drive with precision and peace of mind!
The Dorman 425-176 Steering Shaft is a precision-engineered, corrosion-resistant replacement part designed to meet strict safety and durability standards. Compatible with select vehicle models, it ensures a secure fit and reliable steering performance, backed by extensive testing and a trusted brand reputation.



| ASIN | B000Q0K5SQ |
| Best Sellers Rank | #61,798 in Automotive ( See Top 100 in Automotive ) #86 in Automotive Replacement Steering System Equipment |
| Brand | Dorman |
| Customer Reviews | 4.7 4.7 out of 5 stars (1,417) |
| Date First Available | September 20, 2007 |
| Exterior | Painted |
| Item Weight | 2.5 pounds |
| Item model number | 425-176 |
| Manufacturer | Dorman Products |
| Manufacturer Part Number | 425-176 |
| Model | 425-176 |
| OEM Part Number | 19329330; 425176; JCSI00; SK111014; 19149105; 19153614; 19329330; 88965505; 89060582 |
| Position | Center |
| Product Dimensions | 15.2 x 3.1 x 2.7 inches |
B**E
The Clunk Is Gone!
The clunk is gone! Replaced my old steering shaft with this Dorman replacement and it took care of the annoying noise I was dealing with. Fit as expected and solved the problem. Sometimes the best review is the simplest one, no more clunk! Easy to change!!
A**E
Fits, better design, diy item
Had the infamous clunk for a while, didn't bother me at first. However, it became bothersome and did some research which pointed to the common issue of a failed intermediate shaft. I was in between the factory item vs the Dorman. I made my decision for Dorman based on these Amazon reviews and also price. I am a prime member, so shipping for this item was free. The cheapest place for factory part was gmpartsdirect.com but was $57 PLUS shipping. It was here in 2 days as always (just pay the money and be a prime member, its worth it!). I am a review purchaser- my purchasing decision is based on reviews. I read all the reviews for this item. I followed the tips and tricks mentioned by others. Here is how install went for me. It always takes me more time than what everyone says. I spent plenty of time researching the install as well. this link was useful [...] I still don't see how it only took 30 minutes for first installs for some of these people but I think after the first install, I could do it in 30 minutes. I have an '05 Escalade so this may have been the difference for me. I do not have easy access to the other end of the shaft in the engine bay, nor did I have easy access in the driver's floor board. I was not comfortable in either compartment- its just not easy at least in an Escalade. I believe there are simply more parts and hoses in the Escalade. I agree with the poster that mentioned DO NOT worry about the steering wheel being straight until the bolt in the engine compartment and nut in the driver's floor board are loosened. They were not accessbile for me with the wheels straight. I started the engine and turned the wheel until I had access to the bolt/nut. I first removed the BOLT in the engine compartment (do not try to loosen the "nut"- the nut and metal piece you see is one piece from the engine bay side which you cannot remove). I ended up using some extensions and breaker bar (3/8" drive and 15mm socket). WHILE STILL IN ENGINE COMPARTMENT after the engine bay bolt was removed, slide the ENGINE BAY PORTION of the shaft of the ISS forward towards the firewall- mine was done with my hands and with ease. I actually almost hurt myself because I was expecting it NOT to move. If it does not slide freely then as others suggested- use pliers/vice grips on the shaft and hammer the shaft toward the firewall (the shaft by default is able to move back and forth 3-4 inches). MAKE SURE THE SHAFT IS SLID FORWARD otherwise while removing it in later step, practically impossible. Once that bolt and nut are removed then I returned to the driver's floor board and fully removed the NUT there with 15mm socket, 3/8" ext (long), 3/8" ratchet (same situation here, the bolt has a metal tab attached to it which cannot be removed until NUT is removed). Once these were removed then I turned the wheel straight and shut the car down. I DID NOT use the special tool J 42640 called for (for 2002 and later vehicles which DO NOT have steering lock on them). I decided to use other review's idea and use the shoulder belt through the steering wheel and also went the extra step and did some tie downs from the steering wheel to the driver's seat frame. Honestly all really overkill- you just have to remember NOT to move the steering wheel (other poster mentioned even with the special tool, the steering wheel still had 20deg of play. So, now engine bay BOLT and nut removed and driver's side floor board NUT and bolt removed- it was time to remove the shaft. This is where it was REALLY uncomfortable for me- Not much room while lying on your back. I did try to remove the shaft WITHOUT removing the accelerator pedal but for me it would NOT have worked otherwise (again, I believe it is the way Escalade was made since other poster's were able to remove the shaft without moving the accelerator pedal, Escalade had more parts down there based on pictures I saw). SO after 10-15 minutes trying to remove the shaft without moving the accelerator pedal....I decided to move the pedal. It was actually easy- took 2 minutes to remove and replace- To me worth it. These are two 10mm nuts. The lower nut of the pedal was super easy, the upper nut I had to use 1/4" drive with extension and swivel to get to. I also move the ducting out of the way (under the dash, which helped some). Once it was removed, life was now much easier- the shaft slid right out (you just need the shaft to be parallel to the ground to remove (also with earlier step of sliding the engine bay portion of the shaft towards the firewall). The OLD shaft did have have any issues at the articulation but the shaft telescope with surprising ease but honestly did not feel loose. The Dorman was heavier and thicker metal and shaft slid but with some force. Time to insert new shaft...I made sure the Dorman shaft was telescoped within itself before install. Back to breaking your neck and back while lying flat...I inserted engine bay portion of the shaft through the rubber boot on the floor board then brought the articulated portion up the the steering column and slid the bolt through (the shaft needs to be mated well with steering column in order to slide bolt in). I hand tightened the nut there. Then torqued that bolt to 35ft lbs (per attached link above). I went to the engine bay was able to pull the shaft to the lower steering shaft but with force. I DID NOT have to use pliers/vice grips and hammer to get the shaft to slide. I slid the bolt through and hand tightened the nut there, the torqued it to 37 ft lbs. DONE in the engine bay. Back to the driver's floorboard...put accelerator pedal back in place and torqued bolts to 15ft lb, made sure ducting was put back into place, remove the shoulder harness/tie downs, put tools up, done! It took me an hour. Went for drive and NO MORE NOISE and MUCH TIGHTER steering. We really noticed the clunk going up into/down the driveway- gone! I used o be able to move steering wheel a good 30deg before the wheels actually move- not any longer! Much better than $350 from the dealer! Don't get me wrong being in that uncomfortable position under the steering wheel and alot of parts in the way (both compartments), it was still overall easy. I spent alot of time up and down getting more tools. Save time and get some tools ready...worklight, 15mm socket preferably short, 15mm closed end wrench, 3/8" ratchet, 3/8" extensions, 1/4" drive with 4 inch ext and 10mm nut for accelerator pedal, 3/8" torque wrench, possibly hammer/vice grips/pliers, step stool to reach into engine bay, printed off directions from above, and massage therapist for afterwards. Don't get caught up in taking only 30min- if it ends of being so then great but expect about an hour- make sure its done right and things are not forgotten.
M**S
Much better design than the OEM. Easy install, works great!
If you have the dreaded GM clunk then order the Dorman intermediate shaft and don't worry about it again. As soon as I pulled the old one and compared the design you could tell the Dorman was engineered much stronger than the OEM part. Hands down it's a better design. If you're going to replace it yourself, there are plenty of tutorials in the reviews on how to do that. Here are my tips that I found very useful: 1) Turn the wheel so you can get access to the bolt head in the engine bay to break it loose. Turn it most of the way off, but not all. (The nut has an anti turn tab so you can only turn the bolt out) 2) Turn the wheel the other way so you can get access to the nut side in the driver's compartment. Break it loose. A couple of extenders make it easy to get to without taking out the brake pedal. Loosen the nut most of the way but not all the way off. (The bolt head is attached to a tab and does not turn.) 3) Straighten the wheel and lock it in place with your seatbelt (if you turn the wheel once you remove the shaft it will break the clock inside of it and that's a $200 repair). I just ran the seatbelt through the middle of the bottom of the wheel and then pushed the seat back so it made the belt nice and tight. 4) Remove the negative battery cable. 5) Remove the Airbag fuse (it was the SIR 15A fuse under the hood in my 2003 Suburban). Wait 2 minutes and then unplug the yellow four connector with the red safety tab from under the knee panel inside the driver's compartment. Push the red tab back through with a tiny screwdriver. 6) Remove the dust boot attached to the firewall that covers the u-joint of the shaft. There are 3 sheet metal nuts (i.e. don't put a lot of torque on these guys when you put them back on or they'll break). 7) Remove the nut/bolt combo on the engine side. 8) Push the engine side of the shaft in towards the steering wheel (it slides in and out). 9) Remove the nut/bolt combo on the driver's side. 10) Pull the whole thing out and take the dust boot off. Install the new one: 1) Check the engine side fit of the end of the shaft. Mine was 5/100" too large and I had to hit it with a hammer to bend it in a bit so it would fit. Some people grind it a bit. This is not the part that "wobbles/clunks" it's the spindle shaft that is the problem so it doesn't have to be a super tight fit, that just makes install harder. 2) Optional (I didn't do this and most others don't either): Add a bit more lubrication to the inner extension shaft (just pull both ends and it will come out -- should already have oil on it). 3) Put the shaft in the dust boot and fit it into the driver's side of the steering column. Hand tighten the bolt/nut combo so it stays in place. 4) Reattach the dust boot. Remember to go easy on the torque, just lightly tighten it or you'll ruin the sheet metal nuts. 5) Stretch the shaft out and attach it to the engine side of the steering column. Hand tighten the nut/bolt combo. 6) Reattach the battery cable (leave the SIR fuse out and the yellow connector off for now). 7) Start the car and rotate the steering column to get access to the rotating bolt or nut to torque it down. Follow your manual's torque recommendations. 8) Turn the car off. Plug the yellow connector and red safety tab back in. Put the fuse back. Turn the car on your Airbag indicator should turn off after 6-8 seconds (if it did before you started this procedure). That should do it, put your knee panel and trim panel back on and you're done. No more clunking!!
P**Y
Chevy Surburban steering clunking noise solved!!
Finally got rid of the clunking noise made when on rough roads and in low speed turns. This has been a problem for 2000 to 2006 models. The initial TSB called for lubing the shaft with grease to help dampen the noise. This is not a permanent solution. Amazon was the cheapest at 47.00 (free shipping) compared to my local auto parts store which had them for 76.00. Relatively easy job as its basically 2 bolts that hold the shaft in place. There are numerous DIY's and youtube videos on how to replace but here are the steps I took: 1) Start car and turn wheel so that you can see the bolts to get a 15mm socket on them. Loosen nuts but do not remove bolts. This part is done under the hood and inside under the dash. Once loosened, turn wheel back to center position. 2) Grab a bungee cord and secure wheel in center position. (Do not turn wheel once shaft is uncoupled, you will be sorry as your steering wheel controls will stop working).Remove bolts. 3)Disconnect shaft from steering wheel and steering box. 4) Pull shaft through firewall into cabin. Some DIY's called for the gas pedal bracket to be removed but I was able to wiggle shaft free without removing bracket, be sure to collapse shaft (like a shock absorber) as the shorter length made it possible. 5) This part is beefier that the one removed so I had to modify slightly (with a hammer) to make it fit but it was very tight. Only the end under the hood needed to be modified. 6) Once shaft is recoupled, attach bolts, remove bungee, start car, turn wheel to see bolts again and torque the upper nut to 47Nm (35 lb ft)and lower to 50Nm (37 lb ft). 7) Enjoy your quite ride and tighter feel and response to the wheel.
L**E
quality product!
I installed this into my 04 Chevy 2500 HD Diesel. It is of very good quality sooo much better than the original one. It was a perfect fit and very easy install. Fast shipping was great too. Would buy from them again for sure.
A**1
Make sure it fits into lower shaft before installing!!!
This went into our 2002 Suburban which like everyone else that has had the "clunking noise" problem, I wanted it fix and decided to do it myself instead of forking over $300+ to the dealer or a mechanic. If it had gone together smoothly I would have given it 5 stars. Like the subject line says "make sure they go together easily or it will be a major undertaking getting it done after you have installed it". I wish I had checked this prior to putting it in. What could have been an easy 30-45 minute install turned into a 2+ hour ordeal. The old GM shaft just kind of fell or slid right out of the lower steering shaft so I never thought this one would be a problem going back together. Well, after getting it in I couldn't get it to slide together to bolt it to the lower steering shaft. So I called on my 13 year old son since he works out and his hands are smaller than mine to get a grip on the shaft and try to slide them together. Nada, zip, nothing and he says "Dad that is not going together without some force. We tried vise grips and tapping it with a hammer, which is hard since room is limited, didn't budge or maybe a smidge. Finally, out of frustration and not wanting to take it out and put in the old one back in, I got in from the floor board side and took a hammer and screwdriver and started hitting it on the shaft attempting to push it down into the lower shaft. It started to move some so I decided if I took the gas pedal off I could get a better angle on it. Matthew attempted to pull while I tapped and to let me know if and how much it was moving. It moved into the shaft some and then wouldn't go anymore. So, I got a crescent wrench on the inside of the shaft for more surface area to it and started pounding and it started to slowly move and the hole started to line up but it was slow going. Finally, I had enough and just started wailing on it and Matt stated yelling. I thought he was hurt or something and stopped to check on him. I had hit it hard enough for the holes to line up and he was so excited that they had finally come together he was celebrating and didn't want me to move it any further because he knew the bolt had to go in. What a night of frustration, but a great father/son bonding time in spite of the obstacles, bruises, sore hands, frustration, etc. Anyway the tolerances must be off on this product in matching to the lower shaft, but it is very tight and I will probably never get it off without cutting it or removing the lower steering shaft to try and get them apart and hopefully that will not be necessary in the next 80-100,000 miles It is solid and tight driving and no slop or movement like before, just wished they mated together easier. We cleaned up and took it for a celebration spin and Matt kept "asking how is it driving dad, is it tighter than before"? He was so excited and proud of the accomplishment and that he got to help me fix it. So,I'll take Matt up to the parking lot tomorrow so he can try it out since he will be driving it some in a couple of years and will appreciate how smooth it now drives, I think better than when it was new. Our 1999 Suburban never had this problem. Why couldn't GM designed the part right the first time. I understand they have had 3 or 4 revisions on this shaft design to fix the clunking problem. No wonder they had to file for bankruptcy, just look at all of the poor designs that went into their vehicles that could have been done right to start with had they just applied themselves.
T**Y
Fits & Works
Was replacing the lower steering column bearing and decided to replace the this at the same time on my 2007 Silverado HD2500 Classic. However, this was not causing the steering rattle but it fit just fine.
B**G
Piece of cake to install. The bearing on the other hand. U will say alot of cuss words.
I have a 04 tahoe with a 3/5 drop. Every piece in my front suspension is brand new. Even bushings. All except steering box. I did not have the clunk but had some slight play. Adjusted steering box then ordered this along with the green bearing. Misewell while it's out. This did however tighten up the steering a little. I just replace stuff cause I want all new parts. anyway the shaft was cake to install. Some other reviewers stated they had trouble connecting it back under the hood. I did not I just pulled an wiggled and it went right in. U just have to have it lined up perfectly. I took it out an put it back in under the hood. Just took the 3 bolts off for the boot an put the new one in the boot an re installed. Piece of cake. However the bearing was not so easy. 5 min for the shaft an took me over a hour for the bearing. To get it slid all the way up. I have the adjustable pedals also an did not take nothing lose. That wasnt the problem its just a tight fit. The wrench trick did not work for me an I tried pry bars an everything u could think of. I've replaced the lower control arms myself an it wasnt this hard lol. I even tried my air hammer up against the wrench. What finally worked for me was I put Gloves on an laid on my back in floorboard an just kept grabbing it an wiggling it to force in on. Never wanna do that again lol
S**U
Exactly as advertised
Arrived within the advertised time frame. Fit the truck properly. Appears to be properly built. It has quite mixed reviews on YouTube. Much less expensive than OEM, but because it is a steering component, anyone should be taking a very careful assessment of aftermarket offerings. If OEM was so much better, it should not have failed, right?
L**S
Bye bye clunking
Clunk is gone in my 2004 GMC Sierra. But I didnt know that you arent supposed to spin your steering wheel! I broke my clockspring wires and ended up fixing it myself by taking off my steering wheel and soldering it. No more "Service Airbag". Now I can enjoy driving again haha. Just dont turn your wheel more than once all the way around! The part does fit snug in the lower shaft, took some wiggling. Some people file it /grind it so it slides in easier, thats probably not a good idea and could lead to early wear. I did the plastic steering bearing (Dorman 905-512) at the same time, but it was pretty hard to push in, very hard to get to spot. In hindsight I would just by this shaft first and see if all your noises go away since its so easy to take the two bolts off, if it doesn't then get the bearing .
L**.
Very impressed with this product!
It's better in design than the local dealer's GM part, plus considerably less expensive. After the easy installation, my 2006 Silverado feels like a new truck, no clunking, no noise in the steering. Highly recommend it to those in need.
F**O
Perfect
Steering noise gone. The famous gm steering clunk and groon no more. Easy replacement great fit. Did not replace upper bearing. 04 Suburban..😀
N**E
Four Stars
worked perfect
Trustpilot
1 month ago
2 months ago