


Buy anything from 5,000+ international stores. One checkout price. No surprise fees. Join 2M+ shoppers on Desertcart.
Desertcart purchases this item on your behalf and handles shipping, customs, and support to Austria.
⚙️ Bring your bricked BIOS back to life — because downtime is so last decade!
The AiTrip EEPROM BIOS USB Programmer CH341A kit is a professional-grade toolset designed for in-circuit programming and recovery of 24/25 series EEPROM and SPI flash chips. Featuring a precision SOIC8 clip with beryllium copper needles, a 1.8V adapter for voltage-sensitive chips, and USB connectivity, it enables reliable BIOS backup and flashing. Ideal for tech-savvy professionals and enthusiasts, it supports multiple programmer models and integrates smoothly with Linux-based flashing utilities, making it an essential rescue tool for bricked motherboards and graphics cards.
| ASIN | B07VNVVXW6 |
| Best Sellers Rank | #10,710 in Industrial & Scientific ( See Top 100 in Industrial & Scientific ) #22 in Semiconductor Products |
| Brand | AITRIP |
| Color | USB Programmer Set |
| Compatible Devices | Desktop, Television |
| Customer Reviews | 4.4 out of 5 stars 555 Reviews |
| Data Link Protocol | USB |
| Hardware Interface | USB |
| Manufacturer | AiTrip |
| Minimum Required Operating System Version | Windows 11 |
| UPC | 701715454453 |
N**F
Quality item that worked for saving my Z490 Motherboard
I was able to use this to fix my bricked MSI Tomahawk Z490 motherboard. Like many others, it failed after a simple BIOS update. From then on it would refuse to boot, no POST, no nothing but some fans at idle. The only thing that would come on was a single "CPU" LED. Hard resetting the BIOS/removing the battery, etc. did not do anything. And naturally, this board does not have any kind of "bios back" / bios recovery system. I figured it was bricked, but reading online gave me some hope about the possibility of reprogramming the BIOS chip externally. So, after a ton of research, I ended up buying this programmer linked below clipped it onto my BIOS chip* Was concerned about the whole 5V output instead of 3.3V, but read some people who said it worked fine. I rolled the dice and it worked fine for me also. I did not have to modify my programmer's output voltage. Now clipped in, I was able to detect the chip, and read and make a full backup of it. I then wrote the most recent BIOS to it and rebooted. Unfortunately now the board didn't turn on at all. Not even the LED diagnostic light. Rats. I keep at it though, and eventually I decided to flash the BIOS that was the original version it had before I did the upgrade that broke everything. I reboot, and BAM, it POSTs! From there I manually update the BIOS through the BIOS itself and a flash drive with each firmware update file. Every update takes, and I end up with a fully up to date motherboard with almost everything working.** *The SOIC 8 pin clip is very finicky, cheap, and I don't think would be good for more than a few attempts. The more I played with it / the longer it was on the more messed up the little tiny gold tabs became. **My Intel NIC's MAC address was hosed after this. I was able to figure out what it should be by looking it up on MSI's website, as they weirdly have a tool for that. Then booted off a linux USB and used some commands to write the original MAC to the NIC. Rebooted and verified all looks well in windows.
C**E
Plug all adapters together correctly or you WILL fry your chips
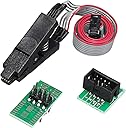
Bricked both my bios and backup bios by being an idiot. This tool was the only way to save my $1100 graphics card. I found the bios chips, clipped it on, and it failed to read the first time, but I disconnected it and reseated it and the second time it worked flawlessly. The second chip read the first time no issue. Both chips were programmed and the verifications were successful. The thermal putty was ruined so if you do this buy some extra putty and thermal paste just so you're not waiting for that to come in the mail. But the flashing was pretty effortless. I never thought I'd ever have to do such a thing nor be so straightforward. This board is by default 5 volts. Google the letters on your bios chip to see if yours needs the 1.8 volt adapter cause if it does, you'll fry the chip if you use the programmer without it. Watch some YT videos on how to use the adapter or you might damage it that way too. Everything has to be set up correctly but once that's done, the process is pretty easy. For my 7900 XTX, these are the steps I followed to flash my BIOS's: To use the 1.8 volt adapter, install the adapter into the main board with the USB bu plugging it into the 8 slots closest to the USB end (25xx slots) oriented so that the arrow on the adapter is facing the lever on the main board. Then, plug the clip adapter with pin 1, 4, 8, and 5 lined up. Then plug the clip into the clip adapter with the pink wire towards the 1 on the clip adapter. Then you will fasten it to the chip with the pink wire on the clip at the corner with the dot on the chip. That's the power wire. You have to make sure that's properly aligned or it'll try the chip. Once that's done, if you don't have any linux installed, grab one and put it on a flash drive and boot into it cause it's a heck of a lot easier on Linux than Windows. 1) open terminal on any Linux os. 2) "sudo apt update" 3) "sudo apt install flashrom" Plug the USB in with the clamp on the chip. 4) "sudo flashrom -p ch341a_sp1" If it says no flash found, then unplug USB and reclamp the chip, then plug back in and repeat step 4. 5) "sudo flashrom -p ch341a_spi -r bios ackup1" This will backup the bios on the chip. You want to do this step three times each time calling it "biosbackup2" and "biosbackup3". You need 3 copies to test that it's reading properly (stable connection) 6) "sha256sum biosbackup1.bin biosbackup2.bin" If the characters match, then: 7) "sha256sum biosbackup1.bin biosbackup3.bin" If those numbers also match, then it's a stable connection and the data read with no problem. The bios you need to flash should be located in the same folder the bios backup files are being created. Usually in the explorer it's in the home directory. Copy it there and name it "newrom.bin". Now you'll flash the bios to the chip. 8) "sudo flashrom -p ch341a_spi -w newrom.bin" You'll see it process through a bunch of steps and if at the end you get a text that says "VERIFIED" then the flash was successful. You can always back this up again as biosbackup4.bin if you wanna check that the hashes match the newrom.bin you copied, just as an extra assurance it is a perfect copy. Once done, you can do the same if you have another bios chip thats bricked (I screwed both mine up ha!). When done, replace thermal paste, putty, and pads, close her up, and boot the board up.
M**S
Decent kit, but clip isn't great
Worked as intended, but the clip did NOT want to go on and stay on like it was supposed to. Ended up having to shave one side down to even get it on, ended up giving up and buying a different clip
Y**P
Works programs bios 1.8v for me at least so IDK...
1.8v bios using the adapter programmed just fine using this adapter just be ready for a large project and make sure you have all the data if you want to get your TPM working. Comes with everything needed except software. Linux makes it pretty easy to program with this thing the only problem is the rest of the modifications must be done with windows software. Manufacturers should get with the times and start open sourcing stuff I feel at this point it is the only way to assure security long term really. A video camera whatever be the case they should open source the SDK put enough storage and ram on them to keep them upgraded and let open source do its thing. Just like these guys do sell hardware. Goes for routers computers and everything really. No instruction manual either but pin 1 goes to pin 1 with the circle is what I figured pin 1 is the red on the ribbon follow that through and you can only line it up one way I also put it on when it was not powered to avoid any discharge or transient spikes.
C**Z
A Nice Bang for Your Buck!!
I'm reviewing the Black CH341A EEPROM & BIOS USB programmer bundle, with 1.8v adapter. I needed this for a BIOS flashing I had to do, but the tool I'd normally use was no where near me nor did I have the ability to go drive a couple hours to get it. That is a TL866II Plus. This tool, for the price alone, is amazing. I was quite skeptical just because it's incredibly inexpensive, but quite a powerful tool. Some of the observations I've made.... For the construction, there is no case, so you NEED to be extremely careful when using it. That the area where the tool sits isn't conductive or that nothing conductive falls on it. Because there's no case, I can clearly see the solder joints are well made, the board is a nice thickness with 2 conductive layers. There are 2 LEDs that allow a user to see power to the board (red LED) and another to alert the user when it's writing or reading (green LED). There's 2 functional sides to the board, 1 with the spring tensioned clamp, and the other with solderable traces for at least 2 different style or size chips. The smaller of the 2 fitting a Winbond BIOS 25Q64FV chip (5.30mm wide), which just happened to be the chip I needed to flash. Once I downloaded the appropriate software & drivers, this tool was quite simple to use. I'm not very techy, but do mess around with all sorts of electronics. I'm more advanced than a beginner, but I can't say I'm that experienced with flashing BIOS chips very often... I'm more comfortable with the automotive side, with modules and EEPROM chips, but still not a pro there either. I'm stating this so that a reader can understand where I'm coming from better, and make a better judgment. It's not "so easy for you because you do this all the time" type of deal. Be aware, anytime you're dealing with tools, you need to know their limitations. It's not "which is the best BIOS tool?" or "this tool will do anything you need", no. Some tools can do some chips better than others, just make sure that BOTH the tool AND the software have the capability before purchasing any tool for a specific job. I've only used the tool a handful of times on 2 different BIOS chip series, with one being the chip I mentioned above and the other was a MX25L12873F. I'm also including pics with the tool in use. I think you get a nice bang for your buck on this purchase. I just may purchase a 2nd one, because it just works!
J**Y
Great product
Great programming tools. Shipped fast and just what I needed
D**S
IT BREAKS AND LOSES CONNECTION CONSTANTLY DONT PURCHASE
the bronze pin in the clip broke, it constantly loses connection, not worth the money
M**O
Works great but requires effort
Worked on a bricked W25Q64FV chipset. I did the 3.3V mod but maybe not necessary as I detected and read the chip prior to mod a few times. The clamp worked fine, but the chipset has some large, protruded pins which made it easy. I could not attach the clamp to a Surface Pro BIOS chipset for example. You must install the drivers for this device. Look for CH34XPAR.EXE and CH341SER.EXE and reboot. The device won't work until Device Manager can see it. Make sure that the file is an actual BIOS dump file that matches in exact size the identified chipset size. A regular BIOS update from the manufacturer that is not the same size as the chipset will not work.
A**I
Good tool
Working perfect
J**Y
Got the job done.
This one follows the flawed design where the IC woukd be exposed to 5v regardless of the jumper position. I had to mod it so that the power and data lines are now at 3.3v. Once done, it worked just fine. The clip takes a bit of fiddling around before it would give a proper connection. Once you get a knack of it, it works everything. Can't fault at all, except for the design around voltage limiting.
G**E
Overall OKAY but replace the clip
The CHA341A programmer is acceptable for the price... but the CLIP is a total joke. Get a 5250 Ponoma clip to complete your kit!
C**R
This saved my pc after installing the wrong bios!
So I installed wrong bios update and bricked my old pc (no 2nd bios chip or USB bios port either). PC was fully dead, one second power loops.. removed my bios chip from the motherboard (as I couldn't get the clip on since the bios chip was right next to a sata port) then placed it in the adapter that fitted the winbond 25 series chip and plugged that into the programmer. Instantly read contents and directly reprogrammed correct file. Resoldered chip back onto my motherboard. PC came to life! Very happy
M**.
Steam deck bricking saviour!
I’m a bit of a tech tinkerer. Trying to get the most out of my steam deck. Unfortunately, trial and error is a big part of figuring out how to push a steam deck and it turns out it’s quite easy to push it too far and end up bricking the thing! A guy on YouTube I follow called DIY Papi recommended this to directly connect on to the BIOS chip and reprogram (flash it) to an older version. Pro: This tool (and a bit of patience) saved my steam deck and saved me over £100 in sending it off to Valve to fix. Con: the power supply LED wasn’t soldered on to the mainboard - so I thought it wasn’t working for a while. Quality control probably needs a bit of work. Only bit of advice, take your time getting the pins to line up on the chip.
Trustpilot
2 months ago
2 weeks ago