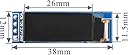
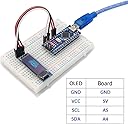
The reason I purchased this display is for the width. Often output from Seeed's XIAO, WIO Terminal, Arduino and my Microbit need just a few more characters. The small form factor helps keep the project small as well. Maybe this will help someone get started with their purchase: Note this uses the U8x8lib.h library for an Arduino UNO #include <Wire.h> #include <Arduino.h> #include <U8x8lib.h> #ifdef U8X8_HAVE_HW_SPI #include <SPI.h> #endif const int buttonPin = 2; // the number of the Grove pushbutton pin D2 - added button for easy viewing int buttonState = 0; // variable for reading the pushbutton statu int idx = 0; // Display Driver Used // U8X8_SSD1306_128X64_NONAME_HW_I2C u8x8(/* reset=*/ U8X8_PIN_NONE); //Normalsdisplay // NOTE: I have 3 displays which are 128x32 (wide and narrow) ////U8X8_SSD1306_128X32_UNIVISION_SW_I2C u8x8(/* clock=*/ SCL, /* data=*/ SDA, /* reset=*/ U8X8_PIN_NONE); // Adafruit Feather ESP8266/32u4 Boards + FeatherWing OLED ////U8X8_SSD1306_128X32_UNIVISION_SW_I2C u8x8(/* clock=*/ 21, /* data=*/ 20, /* reset=*/ U8X8_PIN_NONE); // Adafruit Feather M0 Basic Proto + FeatherWing OLED U8X8_SSD1306_128X32_UNIVISION_HW_I2C u8x8(/* reset=*/ U8X8_PIN_NONE); // Adafruit ESP8266/32u4/ARM Boards + FeatherWing OLED void setup(void) { //pinMode(LED_BUILTIN, OUTPUT); // initialize the XIAOeb LED pin as an output: // initialize the pushbutton pin as an input: pinMode(buttonPin, INPUT); u8x8.begin(); u8x8.setFlipMode(1); Wire.begin(); } void pre(void) { u8x8.setFont(u8x8_font_amstrad_cpc_extended_f); u8x8.clear(); u8x8.inverse(); u8x8.print(" U8x8 Library "); u8x8.setFont(u8x8_font_chroma48medium8_r); u8x8.noInverse(); u8x8.setCursor(0,1); } void draw_bar(uint8_t c, uint8_t is_inverse) { uint8_t r; u8x8.setInverseFont(is_inverse); for( r = 0; r < u8x8.getRows(); r++ ) { u8x8.setCursor(c, r); u8x8.print(" "); } } void draw_ascii_row(uint8_t r, int start) { int a; uint8_t c; for( c = 0; c < u8x8.getCols(); c++ ) { u8x8.setCursor(c,r); a = start + c; if ( a <= 255 ) u8x8.write(a); } } void loop(void) { int i; uint8_t c, r, d; Serial.println("LOOP!"); // read the state of the pushbutton value: buttonState = digitalRead(buttonPin); // check if the pushbutton is pressed. If it is, the buttonState is HIGH: if (buttonState == HIGH) { // turn LED on: digitalWrite(LED_BUILTIN, HIGH); Serial.println("Button pushed"); idx = idx + 1; Serial.print("IDX:= "); Serial.print(idx); Serial.println(" "); switch (idx) { case 1: Serial.println("case 1:"); u8x8.clear(); u8x8.setCursor(0,0); u8x8.setFont(u8x8_font_chroma48medium8_r); u8x8.print("C1: chroma"); u8x8.setCursor(0,1); u8x8.print((int)u8x8.getCols()); u8x8.print("x"); u8x8.print((int)u8x8.getRows()); u8x8.setCursor(0,2); u8x8.print("ABCDEFGHIJKLMNOP"); u8x8.setCursor(0,3); u8x8.print("!@#$%^&*()+{}<>?"); //buttonState = 0; break; case 2: Serial.println("case 2:"); u8x8.clear(); u8x8.setCursor(0,0); u8x8.setFont(u8x8_font_amstrad_cpc_extended_f); u8x8.print("C2: amstrd"); u8x8.setCursor(0,1); u8x8.print((int)u8x8.getCols()); u8x8.print("x"); u8x8.print((int)u8x8.getRows()); u8x8.setCursor(0,2); u8x8.print("ABCDEFGHIJKLMNOP"); u8x8.setCursor(0,3); u8x8.print("!@#$%^&*()+{}<>?"); //buttonState = 0; break; case 3: Serial.println("case 3:"); u8x8.clear(); u8x8.setCursor(0,0); u8x8.setFont(u8x8_font_px437wyse700b_2x2_r); u8x8.print("C3:px437"); //Only TWO rows with this Font for 128x32 u8x8.setCursor(0,2); u8x8.print((int)u8x8.getCols()); u8x8.print("x"); u8x8.print((int)u8x8.getRows()); //buttonState = 0; break; case 4: Serial.println("case 4:"); u8x8.clear(); u8x8.setCursor(0,0); u8x8.setFont(u8x8_font_inb33_3x6_n); //NOT for the 128x32 display - only a part of the "4" u8x8.print("C4:"); //u8x8.setCursor(0,2); //u8x8.print((int)u8x8.getCols()); //u8x8.print("x"); //u8x8.print((int)u8x8.getRows()); //buttonState = 0; break; case 5: Serial.println("case 5:"); u8x8.clear(); u8x8.setCursor(0,0); u8x8.setFont(u8x8_font_open_iconic_weather_4x4); //only one icon u8x8.print("C5"); //u8x8.setCursor(0,2); //u8x8.print((int)u8x8.getCols()); //u8x8.print("x"); //u8x8.print((int)u8x8.getRows()); //buttonState = 0; break; case 6: Serial.println("case 6:"); u8x8.clear(); u8x8.setCursor(0,0); u8x8.setFont(u8x8_font_chroma48medium8_r); u8x8.print("C6: Normal"); u8x8.setCursor(0,1); u8x8.print("C6: Row two"); u8x8.draw2x2String(0, 2, "2X Scale"); //changed from 0,4 to 0,2 for 128x32 display //buttonState = 0; break; default: Serial.println("oooops!"); // if nothing else matches, do the default // default is optional break; } } else { // turn LED off: digitalWrite(LED_BUILTIN, LOW); Serial.println("LED OFF!"); } if (idx >= 6) { idx = 0; } delay(200); } // End Loop