Desertcart purchases this item on your behalf and handles shipping, customs, and support to Austria.
🎮 Level up your Switch style & gameplay — don’t blend in, PLAY DIFFERENT!
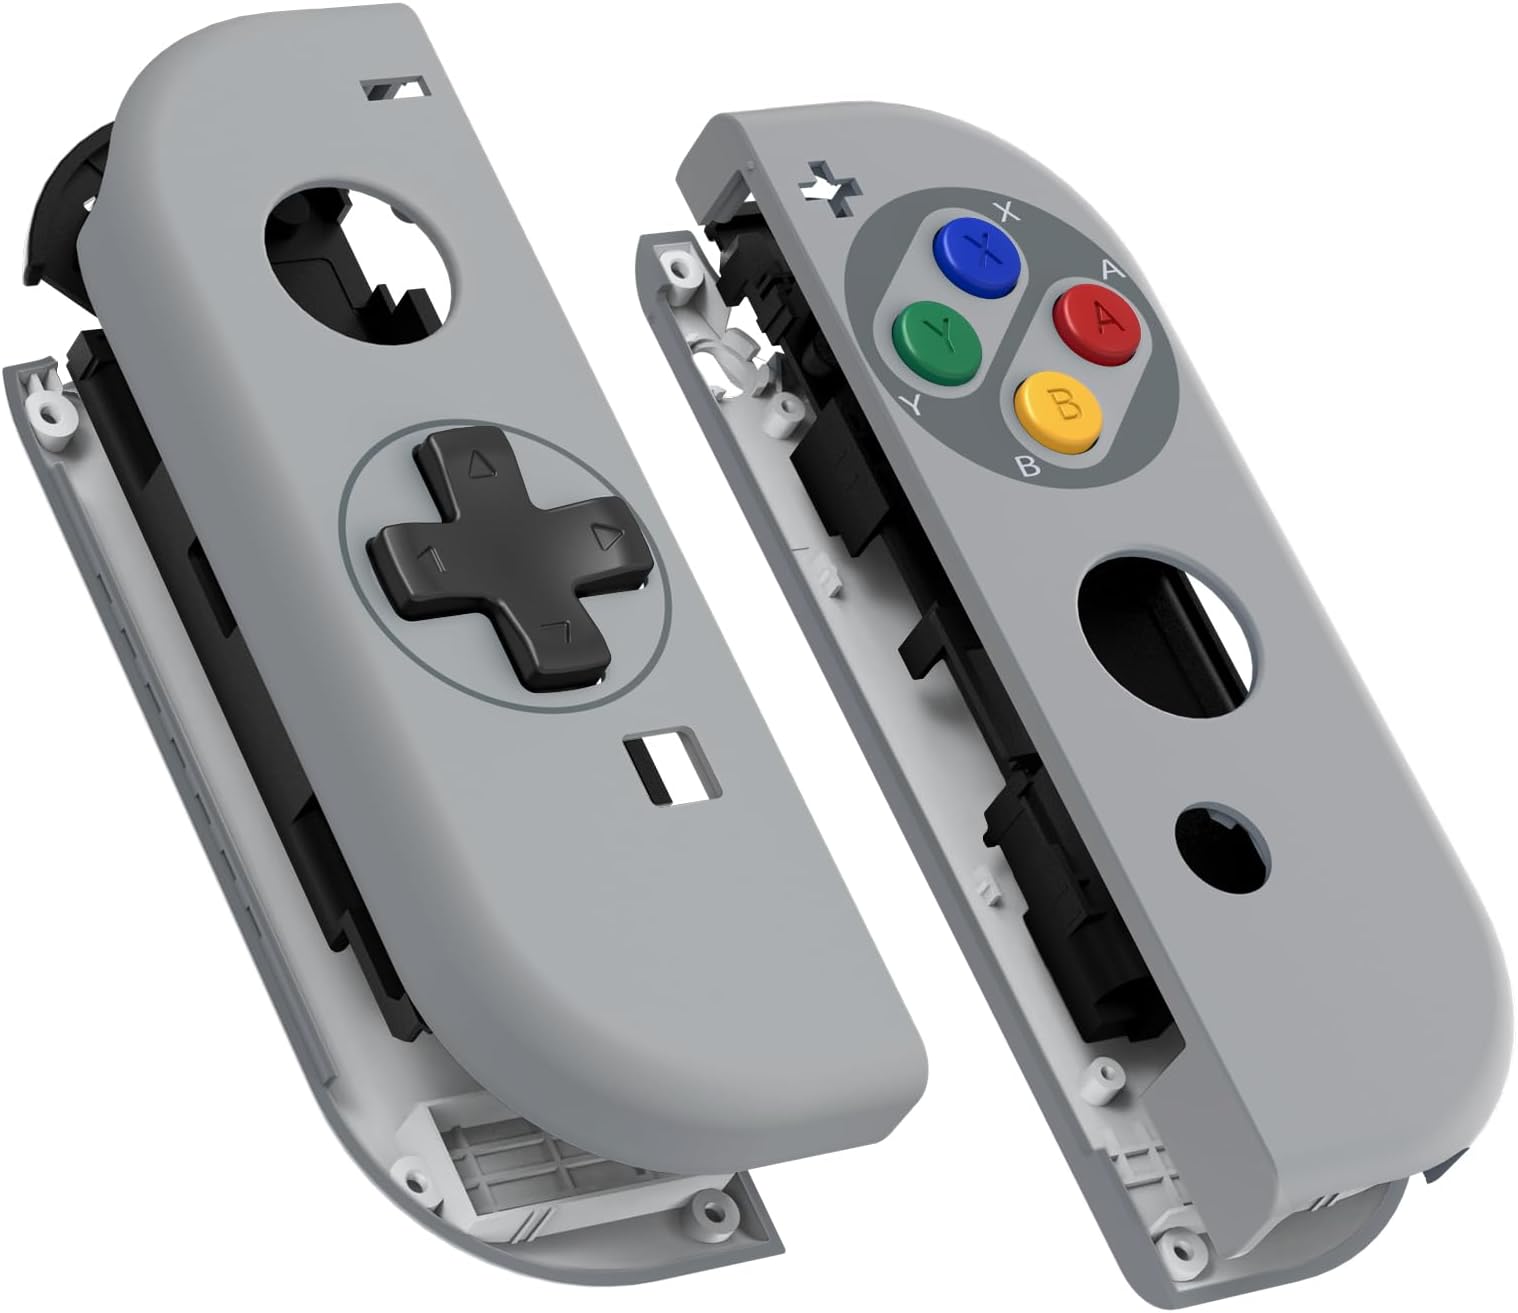
The eXtremeRate SFC SNES Classic EU Style Joycon Housing is a premium DIY replacement shell designed for Nintendo Switch Joycons. Featuring an ergonomic D-Pad for improved control, vibrant colorful buttons, and a durable anti-slip ABS plastic case, it transforms your standard gray controllers into a nostalgic, retro-inspired gaming accessory. The kit includes all necessary tools and parts for moderate-experience users to customize their Switch with a unique, comfortable grip and standout style.


| Asin | B08V4SCFDS |
| Best Sellers Rank | 7,529 in PC & Video Games (See Top 100 in PC & Video Games) 201 in Nintendo Switch Cases |
| Box Contents | No Electronic Information stored |
| Brand Name | eXtremeRate |
| Colour | Classic SFC SNES EU Style |
| Compatible Devices | Controllers |
| Compatible Phone Models | Game Consoles |
| Country Of Origin | China |
| Customer Reviews | 4.2 4.2 out of 5 stars (3,557) 4.2 out of 5 stars |
| Enclosure Material | Acrylonitrile Butadiene Styrene |
| Form Factor | Case |
| Item Dimensions | 10 x 5 x 1.5 centimetres |
| Item Weight | 30 Grams |
| Manufacturer | Extremerate |
| Manufacturer Part Number | JZT106 |
| Model Number | JZT106 |
| Number Of Packs | 1 |
| Product Features | Anti-Slip |
| Shell Type | Hard |
User
Excellent
Good quality highly recommended 👌
User
Looks great! Don't buy separate screwdrivers but you will need tweezers.
Patience, time and steady hands. Three things needed to make this a success.The shells are of great quality (I chose the NES themed black shells with a dpad configuration) and they look great and feel very comfortable.They include a screwdriver which interchangeable heads for Phillips and the Tri type. There are a few reviews on here that said the screwdriver stripped the Tri screws. I believe that the screwdriver supplied (interchangeable heads rather than 2 separate screwdrivers) are the new issued version which is supposed to rectify this issue and I certainly had no issues with it. My advice is to go carefully, line up the shape, apply a good amount of pressure whilst unscrewed, this will still the screwdriver to become unseated and stripping the screw. No need to buy separate screwdrivers.The YouTube video signposted has an incorrect instruction which is in the title but I almost missed it so bear in mind when when watching it.It took me about an hour to do both joycons. I have no prior electronics experience and is the first time doing something like this. I would not have been able to do this task without some nose tweezers - I would suggest you buy a separate tweezers for this job. Search for ESD 15 tweezers and those are the pair that you need. I needed them to pull out and reattach the ribbon that you need to do as part of the task, I have small fingers but I don't think even the slightest of hands could reattach the ribbon without tweezers. Would also advise being careful when you open the joycon, I used a credit card to carefully snap it open so I could just fold it like a book like the video. Try doing this with just your hands and you risk ripping the ribbons and destroying your joy cons.
User
Fantastic replacement shell and a perfect dpad to boot
Such a fantastic shell replacement, the dpad alone is absolutely brilliant and the perfect replacement for those ridiculous directional buttons. The install was crazy easy, just slightly fiddly due to the tiny screws and small ribbon cable attachments. Honestly, after the reviews here and the sales description I was expecting a nightmare install but reality was the complete opposite. Each 'Con took less than an hour, going steady and accurately, and the end result was something legitimately indistinguishable from a genuine Nintendo Joycon... except far better looking and feeling :) Also, there were no bulge issues with the right JoyCon either, no need to shave any plastic notches. I'm guessing this is a v2 kit as it even came with a v.good magnetic switchable screwdriver set too.I genuinely couldn't recommend this any harder, it makes such a phenomenal improvement to the functionality of the left JoyCon and the overall aesthetics are much more visually pleasing. I love it, and the price was excellent too. Next step; ExtremeRate Switch shell replacement too ^_^I'd add some photos of the finished product but it won't let me, sorry :/
User
Acceptable, I like the transparent look
Installing these was a bit of an effort. Lining up the buttons correctly is ideal otherwise you’ll be opening it up again like I did (see image with misaligned < A). I damaged a three inside which meant a screw came out and had to open the case again and glue that screw in.I don’t think the buttons that come with it are very good quality and I only used the z ones and the d pad (you have no choice as it’s different from the original case). I used the black ones from the original jojcons otherwise. It would be great if you could work on meeting the same quality as the Nintendo ones.Buy double sided tape or fold over tape to create a double sided effect with this to keep the battery in place.
User
Looks good but not worth the time!
Like lots of people I like to customise gaming in as many ways as possible, when the order turned up it looked amazing and the idea of installing it is exciting but getting half way into building it you begin to realise how complex and fiddly assembling this is. It’s incredibly frustrating and just not worth the time, I’m yet to finish reassembling it and may just end up buying a new joycon as my current one is in pieces and near enough impossible to put back together.
User
The best by far. Excellent D-pad
Having tried some cheaper shells on from Ali-express, I have had experience of other companies' attempts at this and I can say that these eXtremeRate shells were leagues better than the others.If you haven't modded joy cons before, it will be challenging, as others say. But if you take your time and watch a few videos on YouTube before attempting the reshell, you should be good.The provided screwdrivers with products like this are usually terrible and lead to stripped heads on screws and they often wear away after a few uses. The same can't be said for the provided multitool this time. It's a quality-feeling, part-metal screw driver with a revolving top and two interchangeable driver heads. (a Philips 00 and a Y /Tri-wing 00)The D-pad's design is exactly as 'ergonomic' as the manufacturer states. It feels great playing 2D platformers and retro titles, especially compared with the original directional buttons of the left joy con.The only possible down side to the product is its finish. While the "soft touch" does feel nice in the hand, it can attract smudges very quickly and they aren't easy to wipe down. A minor niggle, but definitely worth mentioning if you're replacing your shells for the sake of aesthetics. You might prefer the hard plastic instead of the soft finish.A great product overall. I paid around £15 and I'd pay as much as £20 for a decent D-pad solution like this. The colours are just a bonus and the quick delivery offered by Amazon is worth forgoing any saving possible through the large Chinese reselling sites.
User
Look great
Not so easy to put together but if you got the patience they look great
User
Great shell let down by quality issues
The shell is really nice to look at; the coloured buttons and d-pad remind me of my old SNES, and the materials are great quality. Unfortunately, the front and back pieces don't align perfectly when screwed together, leaving a sharp edge that's uncomfortable to hold.
User
Ho sbagliato prodotto come devo fare
Ho sbagliato prendere il prodotto sono troppo piccoli
User
Classic Gameboy Case - Nach Umbau sehr zufrieden.
Auf ersten Blick sehr wertiges Umbauset. Einige Nutzer schrieben die Schraubendreher seien minderwertig - Bei sorgsamer Benutzung haben sie für den Umbau gehalten, ohne Abnutzungserscheinung. Das Case ist farbig besprüht - Ich bin gespannt wie lange das hält.Der Umbau ist etwas knifflig. Ich empfehle dringend Videos oder Anleitungen anzusehen. Sehr gut ist die Anleitung von Fixit. Schrauben und Federn sind im Set enthalten, ich empfehle die allerdings nur als Ersatz. Habe beim Zusammenbauen die Originale benutzt.Bin soweit aber sehr zufrieden und werde die nächsten Wochen abwarten und gegebenenfalls die Wertung korrigieren.
User
Buena calidad y diseño nostálgico
Estoy muy contento con esta compra. Me han llegado un dia antes de lo que tocaba, y nada más sacarlos de la caja, el tacto se nota bueno, tienen la misma textura que los originales. Se sienten de calidad. Y que decir del diseño... Son preciosos.Traen un set completo de botones abxy y direccionales de colores snes (por si usas carcasa con botones normales), además de la cruceta, esta última negra. También trae un set completo de botones todos negros (no se si por error, ya que en el anuncio no ponía nada de eso), el destornillador con las dos puntas necesarias intercambiables y toda la tornillería (bien en este punto ya que he perdido uno y lo he podido reemplazar).El montaje es delicado, pero con paciencia y mucho cuidado se hace sin problemas. Recomendado mirar un video o instrucciones por internet para no equivocarse en nada. Sobre todo con mucho cuidado y no apretar en exceso los tornillos ya que las roscas hembra del plástico tienen pinta de pasarse con mucha facilidad.Una vez puestos en la consola los siento con mejor sujeción. Encajan en el cuerpo mejor que los originales (los míos tenían algo de holgura desde que la compré hace 2 años) y siento como si ahora mismo tuviera una cosola nueva.En cuanto a duración de la pintura, botones, acabados, etc... Como los acabo de poner no lo se, pero no parece de mala calidad. Actualizaré en un futuro si veo cambios.En conclusión es un buen cambio, relativamente fácil de poner. Recomendado si tienes paciencia y un mínimo de organización a la hora de seguir los pasos.Gracias
User
Look and Feel great, and not as hard to install as most say
This was my first ever experience opening any electronics up, and basically even using a screwdriver aside from a few occasions. I have to say that this process is not nearly as difficult as many people have said. If you are careful, everything should go smoothly. Here are some tips that made it easy for me:1. Use a better set of screwdrivers and get some tweezers2. I found that these screws aren't too bad to work with but be careful not to strip them. I had worse look with the screws on my switch itself then in the joycons. Once you have the Nintendo ones out, switch them with the replacement screws. They strip less easily and are Philip's head.3. Layout tape on a piece of paper in the shape of a joycon (small rectangle). I played out three of those, representing the outer, middle, and bottom layer of the joycon. Each screw I took out was placed on the tape, in the same position that they'd be placed on its respective layer. This helped keep all the screws organized, and made reassembly a breeze.4. One of the difficult parts of this process is fiddling with the delicate ribbon cables. I simply didn't undo any of them, and I unscrewed everything. Once it was all unscrewed, I transferred over all the insides into the shell in one piece. You have to be a little careful moving it. It is also a little harder to work with since you have all the parts dangling around, but I preferred that then dealing with the cables.As for the product itself, it feels very high quality and nice to the touch. It's defintely on par with nintendo's quality. If i saw these at someone else's house, I would believe they were an official nintendo product.
User
精度抜群で組み立て簡単!
サラサラ系の触感でベタベタしにくく、パーツの精度も非常に高いので純正品と比べても遜色ない、いや、それ以上の出来栄えです。工具、ネジ類は全て付属していますが、純正品のネジをそのまま流用しても組み立て可能です。部品の形は純正品と完全に同じようなので、私がやったように純正品と組み合わせても問題ありません。組み立て自体はそこまで難しくないですが、説明書は付属していません。たぶんYou◯ubeに解説動画があるはずです。
Trustpilot
3 days ago
3 weeks ago