Desertcart purchases this item on your behalf and handles shipping, customs, and support to Austria.
✨ See and be seen — crystal clear headlights in seconds! 🚗
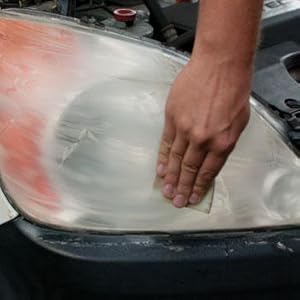
The Wipe New HDL6PCMTRRT Headlight Restore Kit delivers a professional-grade restoration that clears foggy, oxidized headlights in seconds. Designed for universal vehicle compatibility, this waterproof kit includes everything needed for a streak-free finish and guarantees your headlights will pass inspection for the lifetime of your vehicle. Made in the USA, it offers a cost-effective, long-lasting solution that endures hundreds of car washes, saving you hundreds compared to professional services.


| ASIN | B00K889FCI |
| Additional Features | Waterproof |
| Auto Part Position | Rear |
| Automotive Fit Type | Universal Fit |
| Best Sellers Rank | #157,973 in Automotive ( See Top 100 in Automotive ) #127 in Automotive Headlight Restoration Kits |
| Brand | Wipe New |
| Brand Name | Wipe New |
| Color | Black |
| Compatible with Vehicle Type | ALL Vehicle |
| Customer Reviews | 4.1 out of 5 stars 4,602 Reviews |
| Global Trade Identification Number | 00855208004103 |
| Item Dimensions | 5.51 x 2.36 x 5.12 inches |
| Item Weight | 90 g |
| Lens Color | Clear |
| Lens Material | Plastic or Glass |
| Light Source | No |
| Light Source Type | No |
| Manufacturer | Wipe New |
| Manufacturer Part Number | HDL6PCMTRRT |
| Model Number | HDL6PCMTRRT |
| Number of Packs | 1 |
| Special Feature | Waterproof |
| Specific Uses For Product | Head Lights |
| UPC | 855208004103 080313094163 |
| Unit Count | 1 Count |
| Vehicle Service Type | ALL Vehicle |
T**H
Worth the Low-Price Investment
Normally I don't write too many reviews because I buy books or items where a review of the seller based on a crap item isn't fair. Here I chose to do it because the product, at least in the short-term, really works. I just applied it today (06/06/24) so I can't warrant its effectiveness in say a year. It might not last but for today, I'll say that this headlight cleaner was amazing. I inquired from a shop how much it might cost to have my headlights cleaned as they are 10 years old, often in the sun, and are really foggy. They said $250. I thought to myself, why not look on Amazon first and see if there is anything that might come up. This restore kit came up for under $20. I figured, the worst thing that happens is no change or more scratching from the sandpaper they provide. And initially, that's exactly what it looked like. Many more scratches. I thought to myself, "Self, worst thing is I'll have to get it done by someone." Then, I put on the application and wow!! My headlights look amazing. I won't say "Like new" but I will say that it is really impressive. I have some deeper scratches that didn't go away but the product doesn't guarantee that. I couldn't be happier. One critique of the video I would provide, for those listening to it, is that you shouldn't wait for the water to become clear. It isn't going to become clear because you are effectively sanding plastic. It will likely be a thin, milky white and stay that way while sanding with the 2000 grain. You will definitely see a brown run-off initially. Also, the video shows that the headlights are clear after sanding with the 3000 grain. Don't know how that got that, I didn't get that result. I did get a less resistance at some point, as they said I would with the 3000 grain. I was concerned when looking at the headlights but once I put on the chemical application, what a difference!! Highly recommend this kit and it was relatively easy to do. More than the 15 minutes they said, but still, it was a 30 to 40 minute job and it saved me 230ish dollars. I am willing to do it again next year if i need to. Keep in mind, chances are that a long lasting solution may well be just buying new headlights, but who wants to do that??? If this is a maintain that needs to be done once a year or once every few years, it is so worth it! Thank you.
M**G
pretty good product
Its been awhile since i got this product and was able to try it on my headlights till today....its an 06 canyon and they were pretty severely hazed. I really wish i took pics but oh well...one of my upper lights (a DRL) had a fingernail scratch in the coating (from me) but as i mentioned the headlights also were in pretty bad shape. The kit supplied sanding block would work good on a not so badly hazed light but after trying it first (after initially cleaning the lights with window cleaner) i used some 1000 grit and wet sanded all the lights. I even got out the fingernail mark on the DRL then i used the supplied sanding block. When they were dry they looked horrible but like the instructions say...they will look finished like when they were wet with water....its true. While i was sanding them i kept rinsing them off and looking at them to see how clear they looked when wet. When i was satisfied i gave a final rinse and set them aside to dry. As of this writing, i just got done putting on the clear coating and letting them dry before reinstalling them (i took the lights out it was easy and better to sand them then leaning over and worrying about hitting the paint on the fender but it still probably could have been done on the vehicle) After applying the clear coat.... to tell you the truth...I didn't think they would look this good. They look just about brand new. I was initially thinking of replacing them with aftermarket lights but after reading too many complaints of them leaking water i decided to try and refinish the factory GM ones and i'm not disappointed. The only suggestion i can give, is you need to put some extra elbow grease into sanding them....nothing is for free including your labor so don't skimp on sanding them. You'll thank yourself later..... but make sure you keep them wet! Not including the 30 min taking them out and putting the headlights back in it took me about 40 min of sanding, 1hr of drying then a few min of wiping the clear coat on. Gonna wait a couple hrs before reinstalling the lights. Right now their in my garage out of the direct sunlight drying. It says their dry to the touch in 1 hr and to keep them out of moisture for 24 hrs but since i live in the south we usually get a decent dew so i'll prob put a blanket over them tonight till i get up just for ha ha's. This product for the price i say can't be beat. I'm happy with the results. Time will tell me how good this treatment holds up. If possible i'll update this in 6 mos.
C**K
Elbow Grease not included
As many do, I bought this to "restore" the headlights on my car. The kit says it's good for "oxidation, fading, and sun damage." If your headlights are cloudy or dim, it's not because of oxidation, fading, or sun damage. Look at your tail lights. They're not milky or dim, are they? No! And they endure the same weather and sun as the headlights. So why are the headlights milky and dim? The answer is that as you drive, every bit of dust and dirt in the air essentially sand-blasts your headlights. Each speck of dust or bit of dirt causes a micro-scratch only maybe a thousandth-of-an-inch thick. And then dirt gets into those scratches. It's these scratches and the dirt in them that makes your headlights cloudy and dim, not oxidation or sun damage. The cure is not in any wipe-on chemical. No. The cure is in a 2000-grit polishing pad that is included in this kit... and in a generous helping of elbow grease that is NOT included with the kit. My headlights were cloudy and dim with 12-years and 156,000-miles of micro-scratches. With about 30-minutes of elbow grease, about 15 minutes per light, I was able polish off maybe a thousandth-of-an-inch of the surface of my headlights and, with it, those scratches and the dirt embedded in them. I literally felt the surface becoming smooth as I polished. At the end of 30 minutes of polishing, my arms were worn out and so was the polishing pad... but my headlights looked good. Next step: apply the "Miracle" Wipe New solution. This is where the kit as I received differs from the pictures and description. The description says that the miracle Wipe New solution comes on a per-moistened wipe. Apparently, there's been a change. The solution now comes in a small bottle which is only about half-full. A small terry-cloth towel is included in the kit with which to apply the solution. The instructions caution that the solution can damage automotive paint finishes, so I applied masking tape around my headlights as a precaution; it wasn't necessary, but I think it's a good precaution. The instructions also caution against getting the solution on your skin, so I used the included gloves and also put on some safety glasses as a sensible precaution. I put maybe a teaspoon of the solution onto the cloth and wiped it onto my newly-polished headlights. Wow! It really added the final-touch sparkle to my headlights. (While only half-full, the bottle does contain enough solution to do at least eight or ten pairs of headlights. And 2000-grit polishing pads can be purchased wherever automotive finishing products are sold such as most major auto parts stores.) I think that I got an 85+% restoration of my headlights. They really do look very good... and it's amazing how much better my car looks overall because of that. Those sparkling headlights make the whole car look great. I recommend this kit for the restoration of cloudy, dim headlights. It really works. So, why am I not giving five stars? Because the description promises a very simple process, just wipe the miracle solution on and, in a few seconds, all but effortlessly your headlights will sparkle like new. That's not exactly true and, if the people who wrote the advertising would just read the product's instructions, they would know that it's not true. The product delivers the advertised result, but the advertising is very exaggerated about the process and effort required. As I said, I do recommend this kit because it produced good results for me... just be aware that to use this kit you will face perhaps 30 minutes of polishing work and a 45-minute overall project. When you are done, the results will be quite good.
E**E
Wipe New
Finally got to use this.....and believe me IT DOES JUST AS IT SAYS This product is easy to use, works very well After reading the instructions i thought it is sort f misleading the way they do the commercials for it says you must sand the headlight cover...but one only does that IF the headlight is really bad . It comes with a cloth, some gloves a sanding block ( double sided ) and the Restoring chemical wipe . It says you need to spray with water, IF the lens is clear with water on it, you do not need to sand it BUT, if the lens is still hazy with water on it you have to sand it first. with water mine was clear..But I decided to sand it some anyway as it appeared rough I lightly sanded Both headlights using Both sides of the sanding block while keeping the lens wet with water Wet sanding gets rid of all the oxidation and the grime off the lens. i then dried the headlights completely and as the directions instructed with the cloth included I used the included gloves and applied the chemical with the included covered cloth It has a horrible odor and you need a lot of ventilation when using this product. When i applied wiped the lens with the chemical, they were sparkling clear, they appeared like new. they said give it an hour to dry and to not wipe more than once...and if you did it correct it was fine Now if you did it wrong or in direct sunlight it could possibly streak and it says there is Nothing you can do to reverse the streaking. So pay attention to what your doing. It also says give 24 hours to completely cure and do not allow it to get wet by anything, including dew time will tell if this is a long lasting solution....but right now these headlights look brand new I am impressed at how easy it really was and how well it works really restored to new appearance . so yeah, it is Wiped NEW .
R**A
Trying to provide you the BIG picture
Everyone should understand that what you see on the commercial is a total attempt to mislead the public. CLEANING the leans takes forever.... it is tedious, laborious and time consuming. Applying the miracle compound takes only a few seconds. But you must tape off the surrounding area to avoid getting any of it on the paint. And the applicator is only good ONCE.... it dries and is useless so you either need to throw it away after one application or you need to spend the entire day cleaning all the headlights on all your vehicles and then try to get them all done at once. The stuff does work..... but not at all in the way they suggest it works. The lesson here.... nothing is ever as easy as we would like it to be.
R**T
Works as promised and actually last.
I know what most of you are thinking, this is just another gimmick, but as someone who has actually bought and used this product I can assure you that it will work in 85-90% of cases. Like many of my fellow headlight aficionados, having grimy, cloudy headlights not only looks bad but it is a safety hazard. After years driving around with foggy headlights you may not notice the hazard it poses, but others will. Anyway I bought the product and proceeded to clean my headlights, all the while smirking that this will just be another waste of time. I followed the instructions and prepped the lights for sanding, which will take A LOT of scrubbing depending of the severity of your headlights. To give you an idea, I spent about 15-20 minutes on each light. After that it was time to apply the "magic" wipe. Now this is what you will be paying for, the sanding pad and cloth can be bought anywhere, but the finishing wipe is where the real beauty lies. *Make sure you put on the supplied gloves or you risk smudging the headlights with the wipe.* I unfortunately made that mistake in a certain spot. Also the chemical of the wipe is not exactly skin lotion hence avoid skin contact, eye contact or any other bodily contact. I also made that mistake and felt a slight burning afterwards. Its not fun. And the grand finally is truly amazing. The headlights looked brand new. Now I was still skeptical, as I didn't think it would last too long, maybe a few weeks tops. But surprisingly it is now well over 3 months and it is still just as good as when I first preformed the procedure. I would definitely recommend this product and I hope the manufacturer never dilutes its formula. They definitely have a real winner here. * Last word of advice, after applying the finishing wipe, try to face your car in a direction that is away from the wind, preferably a garage. If you are as poor as me and don't have a personal garage, then place to pieces of sturdy card board on the bumper but not touching the headlights, making sure they shield them though. This prevents dust and other particles from attaching itself to the headlights. It will be moist/sticky for a few hours afterwards and you don't want any gunk getting attached to the lights and ruining your hard work.*
C**Y
I Was Skeptical, But It Works!
I have a 2001 BMW, and it's headlights were just horrible. Super cloudy and in need of some TLC. I was debating about buying new headlights, however I'm the type where if it's not broken, why replace it? Also the cost for new headlights was a bit more than I wanted to spend right now, so I started searching into headlight restoration. I found this product on Amazon, read the reviews, checked out the photos and figured I would give it a shot myself. It is cheap, so I wasn't quite sure what it could do for my cloudy headlights. HOW I USED THIS PRODUCT: I had to wait a few days where I knew I would have at least 2 rain free days, and today I decided to give it a shot. The directions are pretty basic and fool proof. I started by putting water on my headlight, using the green side of the tool for about 3-5 minutes. I kept re-soaking the headlight, it was crazy how much gunk was coming off. Next I rinsed it, and proceeded to use the gray side to polish the headlight. I did this for about 2 minutes. Rinsed again, then used the microfiber cloth to dry the headlight. I then did the same on the other headlight, repeating all processes. Next I put on the gloves, and ripped open the pouch with the restoring cloth. With one swipe I covered my entire headlight. Did the same to the other. Done! When I stepped back I was very surprised at how clear my headlights were. They are not brand new clear obviously, and didn't expect them to be. However when you compare what they look like now, verses what they looked like before, it's like night and day! So far I am super impressed. I am anxious to see how long this will last long term. So far I do recommend this! I have included before and after photos, close up and from a distance to give a better view of this product in action!
S**S
It does work but I recommend the wet sanding step even if it says not to
Like many others, I've tried several "headlight restoration" compounds and put in a ton of elbow grease but always came away disappointed. After reading the numerous positive reviews for this product, I figured I'd give it a try. I'm glad I did because my headlights look fantastic and like new, at least for now. Time will tell how long it takes them to haze over again, however I don't expect that to happen any time soon and here is why. The instructions in this kit say to wet your headlights and if they look clear and shiny, there is no need to sand them with the included sanding pad. However, I'm not adverse to work, so I decided to try sanding anyhow because I could actually see the surface haze on the lamps. I used this on an 8-year-old Sienna with moderate haze. Now, don't let the sanding step intimidate you. It is a very fine sanding pad. At 2000 grit, it feels soft to the touch and isn't as course or abrasive as typical sand paper. As As I wet sanded, the watery dirt and grit ran down from the lights and left a lot of noticeable streaking on the vehicle paint. This was even after I had washed the headlights thoroughly beforehand. After roughly twenty minutes of sanding, the lights looked pretty good but still not quite as good dry as wet. However, they looked much better than they did before I sanded. So even though the instructions say there is no need to sand if the lights are clear when wet, I still recommend sanding because I obviously removed a lot of residue and it was definitely more effective than using the polish alone. After thoroughly drying the lights, I applied the polishing compound. The included gloves fit just fine and the pre-moistened cloth was more than enough for both large headlight covers. It says it's good for multiple headlights but given the size of the Sienna's covers and as the towel dried as I used it, I probably could have squeezed in one more vehicle at best. The only tip I can give you about the polishing cloth is to be extremely careful not to allow it to contact the vehicle paint at all. I got a little careless toward the end and accidentally allowed it to touch a tiny sliver of paint along the edge. It stripped the clear coat off instantly. Thankfully, it's only a very tiny sliver that's barely noticeable and once everything dries thoroughly, I plan to wax over it. Just be extremely careful because this stuff is definitely harmful to the finish. This product works and the only reason I gave it four stars instead of five is because I feel the sanding should be a required step, not an optional one. While trying to decide whether I wanted to purchase this, one of the factors that made me wary was the reviews I read where users said their lenses didn't stay clear long. Some claimed their lenses were only clear for a couple months to as brief as a few weeks. I have a hunch these may be users who didn't wet sand first and simply applied the compound. Given the amount of grime I removed from the sanding, I think simply applying the compound is a temporary cosmetic fix at best. If the underlying dirt and grime is still underneath the polish on the lens, I think the haze will return more quickly. Hey, a perfect example is the very test they suggest to see if you should wet sand. Look how effectively and temporarily water disguises the haze.
S**R
Quiet effective
I had replaced left headlights as it was broken, and the right headlight(8 years old ) started looking ugly, white. I spent half an hour wet sanding it and washed cleaned, dried and applied wipe new. Now the difference, between the new and old is barely noticable. Only on close observation can you notice the different. It didnt make it look like brand new but i can say 95% like new. TIP: Make sure you spend good time wet sanding.
Y**O
最高‼️
流石アメリカ製🇺🇸! クルマ先進国の製品でした。 日本国内で発売されているものは、沢山試しましたが今回は大成功でした。 効果絶大です‼️
S**.
Alle Daumen hoch
Also ich muss echt sagen das ist der Hammer. Arbeitszeit 15 min und selbst für ungeübte top. Kann ich echt nur weiter empfehlen.
C**H
Works fine.
Just tried it a few days ago. I wouldn't say they look brand new (or maybe I didn't scrub hard/long enough) but they definitely look much clearer than before. For the price I'd much rather do it myself once in a while than to take it to a garage for a polish.
D**D
Headlights look heaps better
Just right
Trustpilot
3 weeks ago
1 week ago