Desertcart purchases this item on your behalf and handles shipping, customs, and support to Austria.
🌬️ Stop wasting energy—spot leaks like a pro and save big!
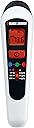
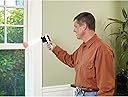
The BLACK+DECKER Thermal Leak Detector (TLD100) uses an advanced infrared sensor to identify temperature differences around your home, revealing hidden drafts and insulation gaps. Its intuitive LED color coding instantly flags hot and cold spots, while the easy-to-read LCD displays temps in Fahrenheit or Celsius. Designed with an ergonomic grip and backed by a 5-step guide, this tool helps you cut up to 20% off your heating and cooling costs by empowering you to seal energy leaks efficiently.


| ASIN | B0044R87BE |
| Alarm | Visual |
| Best Sellers Rank | #214,208 in Industrial & Scientific ( See Top 100 in Industrial & Scientific ) #195 in Gas Detectors & Alarms #1,531 in Temperature & Humidity Measurement |
| Brand | BLACK+DECKER |
| Built-In Media | BLACK+DECKER Thermal Leak Detector (TLD100) |
| Color | Black |
| Customer Reviews | 4.4 out of 5 stars 5,231 Reviews |
| Global Trade Identification Number | 00885911106337 |
| Item Type Name | BLACK+DECKER Thermal Leak Detector (TLD100) |
| Item Weight | 10.4 ounces |
| Manufacturer | Black & Decker |
| Manufacturer Warranty Description | 2 Years |
| Mfr Part Number | TLD100 |
| Model Number | TLD100 |
| Number of Items | 1 |
| Operating Humidity | 50 percent |
| Power Source | Battery Powered |
| Product Style | modern |
| Style | modern |
| UPC | 885911106337 |
| Unit Count | 1 Count |
C**Y
A great tool for finding heating or cooling leaks - or just measuring temperatures
I wanted a remote-measuring thermometer for checking my home for hot spots (in summer) or cool spots (in winter). This one is great! It couldn't be simpler to use, and it's very accurate. It projects a green, red or blue spot onto the wall or other surface being measured. The green spot represents the baseline temperature of a wall or other surface measured when the unit is powered on. The spot turns to red when scanning a surface that is hotter than the baseline temp, or blue when scanning a surface cooler than the baseline temp. The colored spot makes it really quick and easy to scan for hot and cold areas, since you don't need to pay close attention to the actual temperature reading until you find a zone of interest. At first I thought that the colored spot might just be a gimmick, but, in practice, I have found it to be a really useful feature. My background is in science and engineering, so I appreciate instruments that are accurate and work well. I checked this thermometer against several others that I know are accurate and it consistently agrees with the others +/- 2 degrees or better. This is within the specs for this device, and pretty good for under $30. Be aware though, that this unit remotely measures the temperature of surfaces, so it is not a good choice for medical use, for cooking and for other jobs where you need to measure internal temperatures. That said, it will measure the temperature of your skin pretty accurately. It will not accurately measure the temperature of shiny or transparent surfaces, but you can stick a piece of masking tape or duct tape on the surface and measure that. It's so sensitive that it will easily measure the residual heat left by my bare foot standing on a cool wood floor. Leave your foot in place for a minute or so, so that the temperature of the floor is increased by your warm foot. Move your foot away, then measure the temperature at the spot where your foot was, and the surrounding floor. The red LED light will light up when the thermometer is aimed at the outline of your foot, but will turn to green for the surrounding area. (Note: this probably will not work for concrete floors, since they will not warm up enough). You start by aiming the unit at a reference surface, such as a wall, to establish a baseline temperature. (Note: a switch in the battery compartment sets either Farenheit or Celsius for the readings) Then you can select one of three ranges: +/- 1F*, +/- 5F* or +/- 10F*. (.5, 3.0, 5.5 C) I like to start out with 10F*, since that will quickly let you zero in on any serious hot or cold spots. Spend your time fixing those spots first, and you'll get the best bang for your buck. After those spots are fixed, or if you don't find any in the ten-degree range, then move to the 5-degree range and repeat. Aside from its real value in finding and fixing thermal leaks, this thing is a heck of a lot of fun just to play with. My grandkids had fun searching for hot and cold things around the house. On the 5-degree setting, you'll find that just about anything that runs on electricity and stays on all the time (clocks, power cubes, etc.) will turn the LED to red. A/C ducts will turn the LED to blue if cool air is coming out.
G**R
This meter is a dandy, especially if you're tech-nerd
Even if you are an unfortunate non-tech "regular" person. Man, what fun to aim and read this dandy little hand-held temperature detector. This device reads the temperature difference between a "reference point" and wherever else it is pointed around the house (probably only from the inside!). The trick here is to see where temperatures are somewhat lower than the reference point. The reference point, by the way, should be some wall or surface that you suspect is kind of the "average" temperature of the house. This means that the home owner can more easily track down places where cold outdoor air could be leaking in, or where the insulation does not stop heat losses like they should. Leaks almost certainly will be the big heat loss killers (or heat gain into an air conditioned space inside in the summer). Once leaks and losses are narrowed down, then a trip to the hardware store to get some caulk, weather stripping, and limited insulation for hopefully less than one hundred dollars will go a long way to spending less on heating and cooling. A couple notes on this instrument: - This can read temperature differences up to about 300 degrees Fahrenheit, so there is plenty of range. This can be important for finding dangerous HOT spots around the house, and having little to do with energy savings: heating or stove problems hidden from view, electrical shorts behind the wall, etc. - You can set the infrared beam to indicate temperature differences of either 1 degree, 5 degrees, or 10 degrees, giving you a good choice of the sensitivity you are inspecting; and the differences are visual - a green spot for temperature within allowed limits, red spot for too hot, and blue spot for cold beyond the limited tested. - Windows and transparent surfaces (and probably shiny surfaces) will not test well with the instrument. Not a big deal. This tool is an excellent buy.
A**V
A simple way to inspect your home for energy loss
A few years ago, I saw a guy do a home inspection with a high end heat sensor. So, I decided to look for one that was easy enough for me to use, without costing too much. My search led me to this Black & Decker Thermal Leak Detector. Here's how it works... in a nutshell. 1. Point it to something neutral, like an inside wall, then hit the button. Within a second or two, you'll see a reading on the LCD, and it makes a green light on whatever you pointed to. 2. As you point to other objects, the LCD gives you their temperature too, but more important than that, observe the color of the light it projects on them. If it's still green, that object is close to the same temperature as the first object, If it's red, it's warmer... blue, it's colder. 3. You can adjust the range, that determines how many degrees up or down the second object can be before it changes the color. That's it. Before you know it, you'll be like me, pointing it at every door, window, power outlet and wall in your home. It's amazing how many places you'll find where your insulation is failing.
L**N
Very useful to pointpoint cold air leaks
We have an older bungalow house to which we've done a lot of insulation work over the years. Like older houses in the mid-west, we bought screens and storm windows which we rotate in/out semi-annually. Also had cellulose blown into the walls and added lots of attic insulation. But it seemed the house was still not as warm as it should be during the cold spells. This little gizmo helped identify and isolate some areas which were contributing to significant cold air leaks. First, all the floor vents were leaky and a major source of cold air. We removed our central heater and the air ducts, and replaced them with a Rinnia heater in the living room and a free standing gas hearth stove in the rear of the house. Then, we sealed the vents under the floor, put insulation between the bottom and top of the vent, manufactured solid oak wooden grates to replace the metal grills. This was the biggest improvement (about 10 degrees difference using the detector). More importantly, the use much less energy for the same or better comfort level. We also used the detector to determine that our storm windows were not completely sealed. We originally installed them using spring-loaded clips that snap shut. We used two on each side of a window. The detector showed a leak at the top of the windows. That's when we noticed there was a slight bow in them that resulted in the window's metal trim not being flush with the window frame. We added a fifth clip at the top center of each window to correct the problem. This resulted in changes from 2-15 degrees in each window and further reduced our heating cost. For the price, this item is a great value. However, it's not the kind of tool you'll need to use over and over again. But, then, once you're done with it, you can let the neighbors borrow it or sell it used on Amazon!
M**E
Great home improvement tool!
Have only used this thermal detector for an hour and I love it! I found it easy to use right out of the box. Reading the instructions, which were short and to the point, helped with a few problems I was having. It gives a fairly accurate reading for what it is being used for, a temperature comparison tool. Taking a base reading such as an interior wall, and then scanning the outside walls and ceiling for temperature hot spots was very informative and interesting. I used +/- 5 degrees to start with and found several ceiling can lights that were 8-10 degrees warmer than the ceiling around it. It was a 92 degree day outside. The cool thing about this detector is that it changes from the base color of green, it shines at the target, to blue (cooler) to red (warmer) as the temperature changes from the set variance. Just move it around and watch the temperature change. It picked up readings from the air conditioning floor vents (53 degrees) and the temperature drop on the floor the vents ran under. Just try it around your outside interior wall outlets and switch plates. A very useful tool to add to the tool box. It should do wonders to help make your home more energy efficient. There are better and more function driven detectors out there but at a price! For my home use, this is a perfect fit for under $30.
N**K
wanted to like it
I'd wanted this for so long and then it was a disappointment. Maybe my needs weren't a good fit for it because it seems to be effective for others. When I used it on windows where I could feel there was some cold air coming in, it would be a few degrees lower, as you'd expect. So didn't tell me much. And the number jumped around too much to be finely accurate. The cone in which the rays or whatever shoot out probably makes a huge difference; the aiming device should help you keep that consistent. The final straw before I returned it was when I could feel gusts of cold air in my basement coming out from around a wooden panel board that wasn't doing jack, and this thing was acting exactly like it did every other time, showing a degree or two colder. And I'm not sure how it got its reference value. I read the instructions, but as soon as you turn it on, it grabs a reference value, so I guess the lesson is to be aiming it at the right spot when you turn it on.
S**E
Does what it claims...
I've used thermal guns before but this 3 color light indicator is way cool. It makes checking temp delta's very quick. With the old gun (with laser pointer), it was, point at the area you wanted to test and then look at the meter, repoint the meter to a new location and look at the meter again. With this TLD100, it was just move the light around the area you are checking and the only time you have to actually look at the meter is when the color changes. It completely eliminates this looking back and forth at the target, then the meter, then the target, then the meter,... A comparison would be the difference between using a box end wrench or a rachet wrench to remove bolts. It makes the process much simpler and faster. I bought my unit at the wrong time of year when the outside temp was, at maximum, only 30 degrees different then the inside temp so even though I found some leaks, they were minor. My house is about 40 years old and since I bought it a few years ago, I installed storm doors and had added insulation to the attic. All the windows and doors are relatively new and from what I can tell, this house is relatively tight. Even though I didn't find any major problems, it's gives a certain peace of mind to know that everything is okay. This summer when the temps hit the 90's, I'll retest. The bottom line is that for home use and price, this is a very good meter. As some posters have pointed out, there are more accurate meters available and IR camera's that have far more versitility, but for what they cost, it would be much cheaper to not fix your leaks and just pay for the extra energy costs. Addendum: I've owned this product for a while now. When I first got it, it took under a minute to figure out how to use it. The concept behind it is very simple and very well done. At first, to my chagrin, my house seemed very tight and I found no hot or cold spots of any significance. I almost felt like I wasted my money, but there is a certain amount of consolation knowing that everything is in order. Recently, I bought a whole house fan, but my attic access was too small to get it into the attic, so I enlarged the opening. I knew that I would have to insulate the cover to the new opening, but before I got around to it I used this product to see what to expect. It was a warm day and I had the air on at about 77 degrees. When I pointed the meter at the new attic cover, it was reading almost 100 degrees. What that meant was that I had a radiating surface of about 7 square feet at 23 degrees over the interior of the house temperature. Looking toward the future when the winter would come, I could have a temperature differential of over 100 degrees during very cold days. In the summer when the temperature gets into the mid 90's or more, my attic temp exceeds 140 degrees. This would give me a temperature differential of over 65 degrees. I figure that this knowledge alone would pay for the meter in short order. Anyway, I really like having this meter and contrary to what some posters have said about it's accuracy, it's the delta (temp difference) that is the most important thing to be concerned about in this case.
H**Y
Good Product
Appeared to be a good product. Did not use it for long
A**.
A friend in need
This is a great detector, with changing lifestyles a must have home instrument
A**R
Good
Nice product
S**A
Semplice e utile
Esperienza ottima. Perfetto per individuare spifferi dagli infissi, con una buona precisione e di facile utilizzo. Segnala con cambiamenti di colore del fascio luminoso la differenza di temperatura sulle superfici rispetto a quella di riferimento. Buon rapporto qualità/prezzo. Imballaggio impeccabile.
J**L
Bien
Muy fácil de usar, apuntar y disparar. Parece fiable, y con mirar el color del foco ya se sabe si la temperatura es inferior o superior, sin tener que mirar la pantalla.
C**U
bien
très bien fonctionne bien
Trustpilot
2 weeks ago
2 days ago